Your first steps with Git (part I)
Encountering Git is not an easy task : as any powerful tool, it requires some practice before rendering your coding life easier than it already was. Before helping with collaboration with others, it is first and foremost meant to control and navigate the history of your code. That makes it something you also want tonuse on your own, because it helps with keeping track of what you’ve done before (and you will forget it), experimenting on things without risking any bugs thanks to the branching system, and, if you’re that serious, even reviewing your own code !
There are a lot of commands, but the vast majority of your usage will revolve around less than a dozen ones. They are the building blocks of everything else, so take the time to know them well, because they will appear everywhere in the more advanced sections. Do not force you to remember them : first, you can use the recap of all the commands mentionned in the Basic Git commands page, and also you’ll use them so often that soon you won’t have to think about them anymore.
We don’t cover installing git on your machine here : there are plenty of ressources online that can help you with that, starting with the git website itself. Once git is installed on your computer, find a repository of codes that you can work on freely. If any, you can clone the repository you’re now reading from. Open up a terminal window and go to the folder you want to clone the repository into (Pandoc has great instructions to do that from a terminal if that too is new to you), then type
git clone git@gitlab.com:roamdam/git-flow-tuto.git
This will download a folder with name git-flow-tuto, and if you go into that
directory with cd git-flow-tuto, you’re likely to see a (master) next to
the path your terminal window is at. We’ll dive into the master things later
on, for now it is just the sign that the folder you’re in is indeed a git
repository. If you want to use your own folder, which may already exists, simply
go to that folder from the terminal and type git init. This will initiate a
git repository. You’re good to go !

If you haven’t done it yet, I suggest again that you install a GUI to help you visualise what’s happening ! Here are again the links for GitKraken or Sourcetree
Fundamentals : the commit
What happens when you write to your manager, your team or your teacher to tell them what you’ve worked on today ? First you may make a list of what you did, to recap the changes. Then you may write the body of a mail describing, in a more or less detailed way, what you did. Finally, you may send the mail. In git, the commit is precisely that mail. Here is the definition from the Git glossary
A single point in the Git history; the entire history of a project is
represented as a set of interrelated commits
In other words, a commit is a bundle of selected changes in your files, with a message describing what those changes are. When you make a commit (or when you commit), you tell git to record that bundle of changes as a new entry in the history of your repository. Commits are the bare bone of your history : all that you can do with git – branching, simultaneously maintaining different versions, merging versions, going back in time – revolves around them.
Another way of seeing them is as checkpoints when you develop something. You jotted down a new function, and had it working after some modifications. You want to continue working on it but would like to be able to go back to that working version with ease, in case the modifications do not work out well. This is precisely when you would commit your changes, which is recording the state of your function at this time, and be able to come back at it any time you want.
A single file is modified
Say you’ve added a new function in your code, or just changed something in an existing one, and you want to record that change in the git history. First, you add the change to the soon-to-come commit. This is the moment you were writing the body of the follow-up mail to your manager in the previous paragraph. The command is simple :
git add myfile
In the exemple below, I change a word in a printed message from the file
main.py, and I want to record that change. After using git add to add
the change to the commit, I actually do the commit. Making a commit is done with
the command :
git commit -m "your commit message here (short, less than 80 chars)"
The -m option allows you to write the message directly within the command.
You can also use git commit : it will open a terminal text editor (often
Nano or Vim). It can be quite surprising at first, so for your first commits I
suggest you to stick to using -m "your message" when you commit. Using text
editors for commit messages is useful when you want to write long commit
descriptions – we’ll talk about that later.
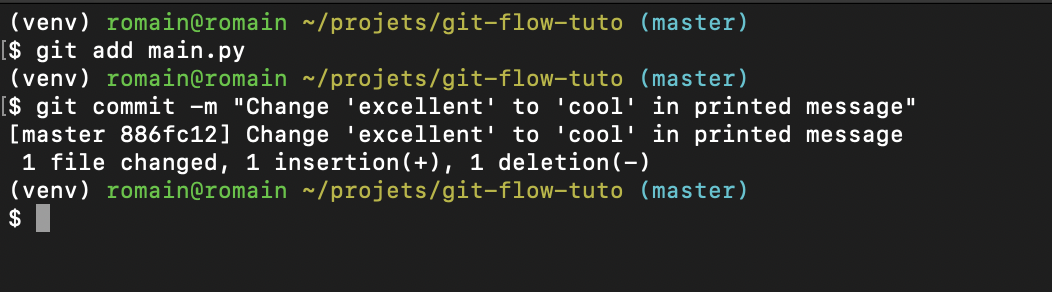
That’s it, your first commit is done. Below is a screenshot of the very first two commits of this repository, visualised with GitKraken. As you can see, a commit is indeed a point on your repository’s time line, with a message that describes it to help remember what happened at that precise moment.

Several files are modified
Obviously, most of the time you want to commit changes to several files in the
same commit, because it makes sense to gather thoses changes in the same history
point. The first option is to manually add each modified file to the commit with
git add. Soon enough you won’t remember exactly all the files that were
modified, so you need to get a list of what has changed. The command for that is
git status
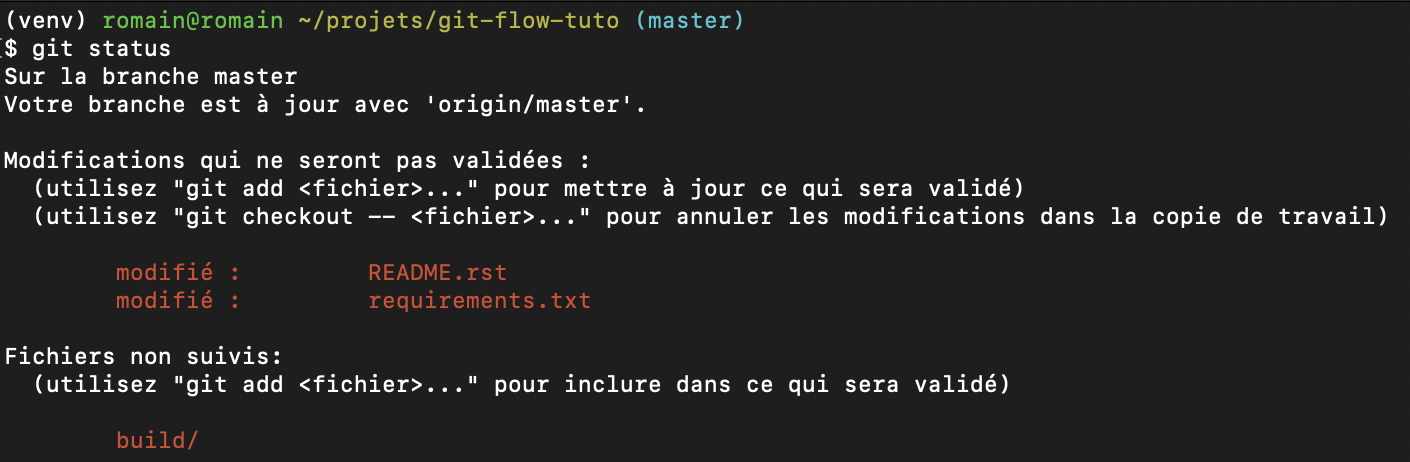
In the exemple below, I made changes to several files and added a new folder. Suppose I had a coffee in between and I don’t remember exactly what files I did change. Using git status allow me to see which files are candidates to be added to the commit, so that I can manually add the ones I want to commit, then commit.
Note that git understands the * wildcard for names of files. So if you want
to add to your commit all files that begin with xyz, you can simply type the
following to add them all at once :
git add xyz*
Note also that when you change files within folders, you can simply add the
folder and git will recursively add the files that have changed in it. Careful
though, do that only if you’re sure that all the changed files in the folder are
to be added to the commit (beware the infamous .DS_Store).
The combination of git status and git add is useful when you want to
select precisely the changes to add to the commit (which is, not adding all of
them), but can be a rather heavy procedure. To add all modified files to a
commit at once, simply use the -a option of git commit :
git commit -a -m "your message commit"
Again, always check with git status that you do want to add all files
before doing so. Often, unwanted files are recorded in history just because of
usage of the -a option (especially big files that you’re not supposed to
store on git). When a file is added to git, it is not that obvious to delete
it as if it was never there…
Note that the -a option does not include new files that were never in git
before. For those new files, you have to use git add. In such a case and if
you want to add at once new files and all modified files, feel free to use the
&& operator to make two commands on the same line : one to add everything,
the other to commit :
git add . && git commit -m "Add all modified files !"
Caution though, git add . is quite a risky command since it literally adds
every new or modified file in your repository. Always check with git status
that there are no unwanted files to be commited before using it.
How to decide which files to add to a commit ? This is up to you really, but a good rule of thumb is that each commit should represent a coherent version of your code (I’m not saying functional, just coherent). Say you’ve modified two scripts, then documented them in documentation files, and finally wrote unit tests.
A sensible choice here could be a first commit that includes the first script, its documentation and tests, and a second commit that includes the second script, its documentation and tests ! Even if it is not the order in which you wrote things, it is an appropriate organisation of versions for every user that might have a look at your code later.
Several files are modified, several times
Until now I made as if you would commit just in time after each modification. All rigourous that you can be, sometimes it will not be the case. In that situation, you may end up with a lot of files modified, and these modifications would correspond to different steps in your work or different features.
In that case, you generally don’t want to add the whole file into the commit, because you want to make it clear to others (or to future-you) that you first worked on feature A on files X and Y, then on feature B on files X and Z. Adding all X, Y and Z to a single commit makes it harder to know what happened in that particuliar moment of the history, and which feature development it was tackling.
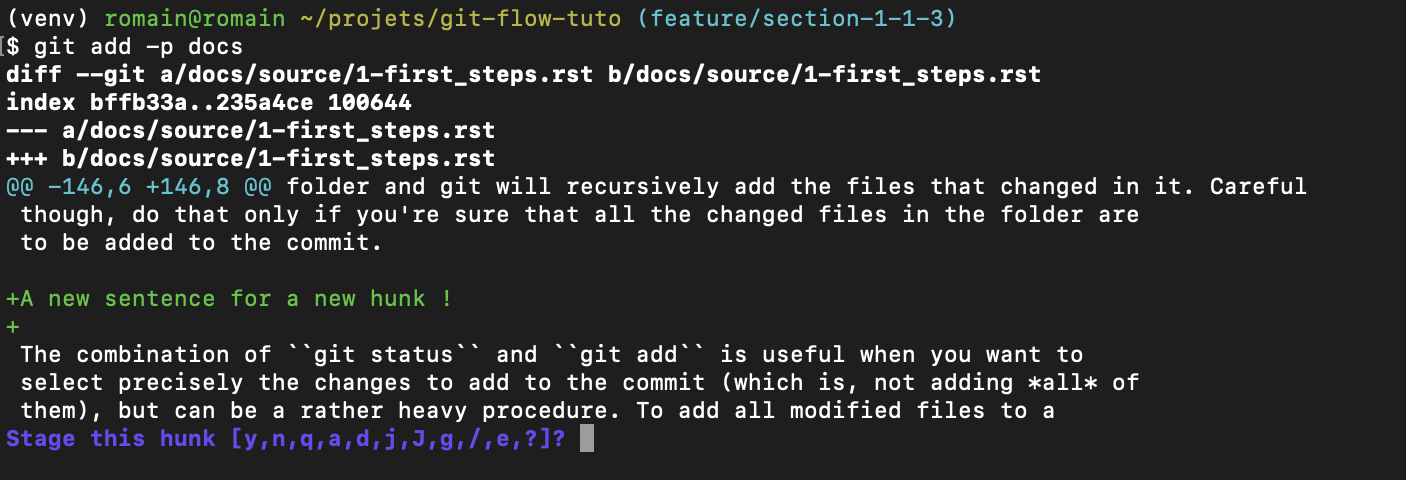
The solution is to add hunks of your files to the commit. That is : you select the precise lines in your files that will be added, while the others remain in the list of non-committed changes. The easiest way to do that is the following command, for instance for file X :
git add -p X
The -p option stands for patch. Git will display in the console each
hunk of your file that is a candidate to be added to the commit. By typing y
or n, you manually add lines of file X to the commit, so that you don’t mix
up features A and B in your commits ! That procedure is a part of
interactive staging, which offers a lot of possibilites that we do not cover
here.
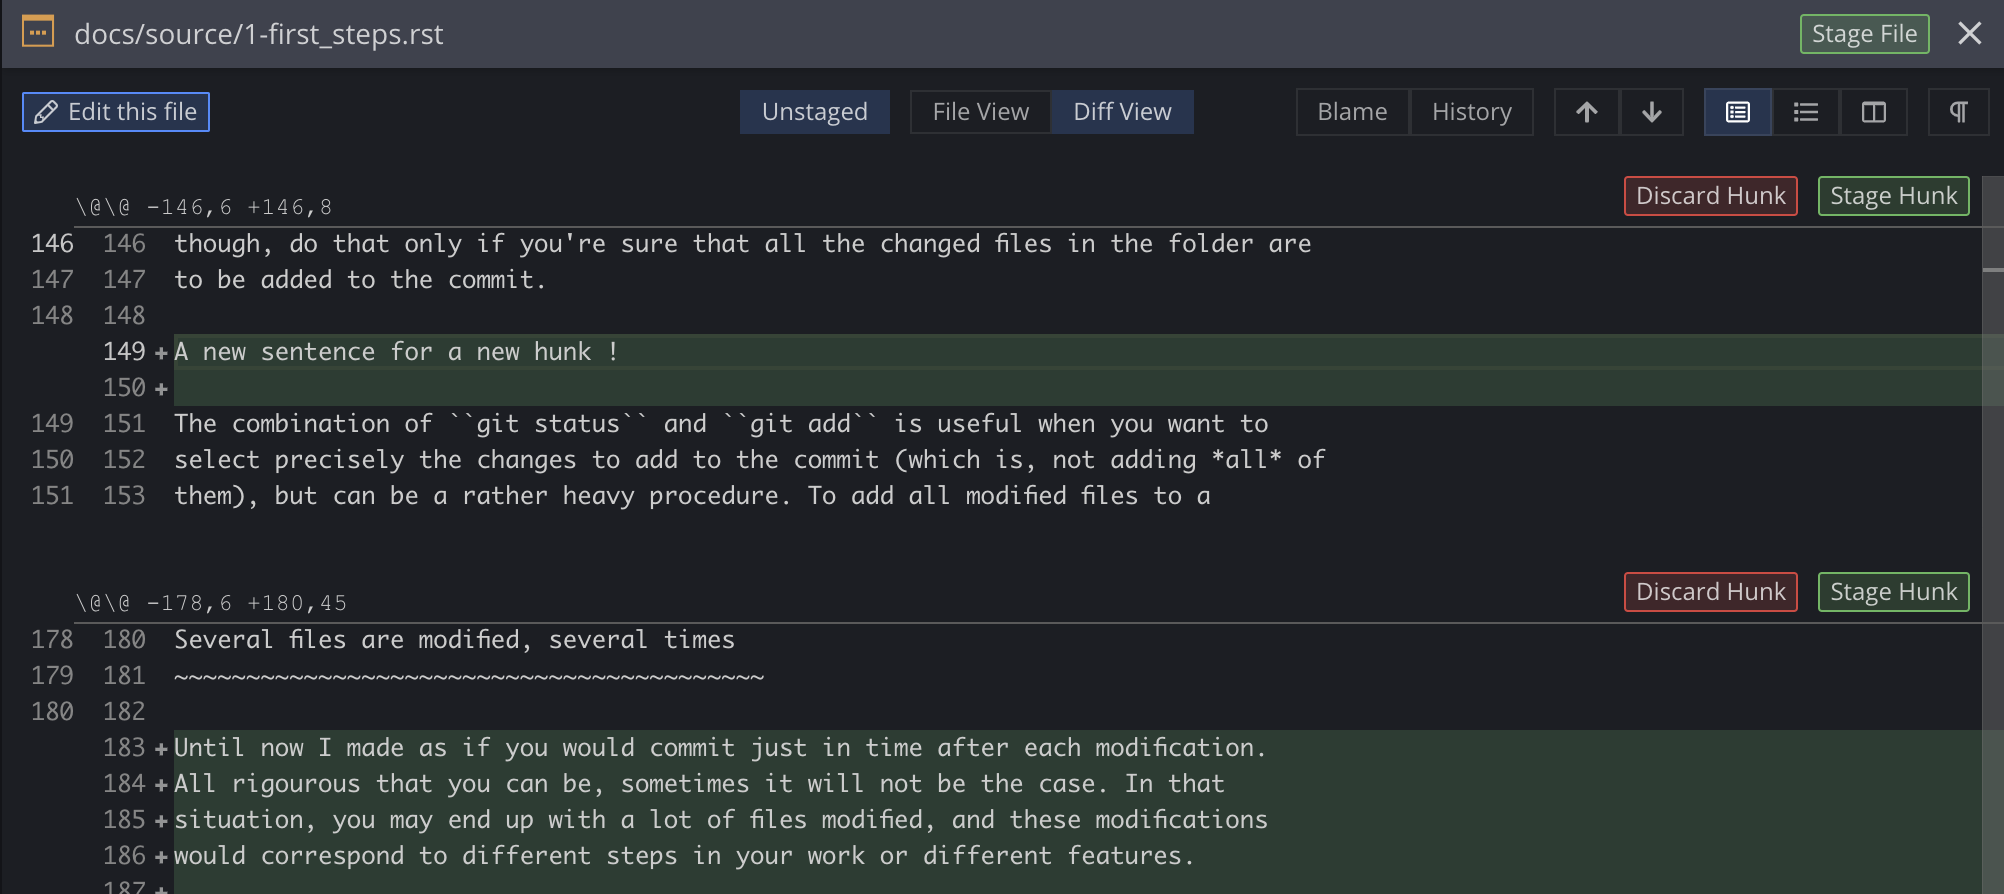
With this command, you’re starting to see that Git bash is not that friendly when it comes to interact a little bit more than what you do for a simple commit. When you’re in the case where you modified a lot of files, and still want to organise properly the commits by adding the right parts of the right files in each commit, do use a GUI to do the interactive staging operation.
It is not only easier, it is also safer since you clearly see what you’re doing. From a terminal window, this is often not exactly right. Below is a screenshot from GitKraken. Adding hunks of files is easy and transparent there, as it is with most GUI.
Note that you do not control what Git sees as a hunk. It is in most cases quite effective at severing them at relevant lines, but sometimes this forces you to stage into the same commit lines that you would have wanted to keep in different commits. Well, that’s a good reason to commit even more often. You can also decide to select lines one by one, but again I strongly advise to that with a GUI, for the sake of comfort and seing what you’re doing.
We’ll see later that you can squash numerous commits into few commits, so in that matter, when you’re developing a new feature, or simply working hard and making a lot of changes, do commit very often. You’ll have time to tidy up the commits when the rush is behind you, and you won’t regret to have a detailed history of all the changes you made, and unmade, and made back…
Time travel : an introduction
To this point we’ve only used git to go forward : making changes to the code, then recording them, each commit adding a new point into the repository’s timeline. Sometimes you commit something and it is only seconds before you realise that you either forgot to add a file to it, or conversely you’ve just added a 1Go csv data file that has no reason to be in your git history.
Here are some simple commands to fix this when it happened in the last commit. When it happened way before the last commit, head over to the time travel section !
Amend a commit to add missed changes
In this scenario, you’ve just commited and you realise after checking with
git status that you’ve forgotten to add a certain file. No worries here :
you can easily add supplementary changes to the last commit with the --amend
option. It also allows you to rewrite the commit message. If you do not provide a
message with -m "my commit message", it will use the previous value but will
still ask you to validate the message with the default text editor. The workflow
to amend a commit is :
git add file1
git commit -m "Add file1 and file 2"
# Ah ! forgot to add file2
git add file2
git commit --amend -m "Add file1 and file2"
Amending a commit is already rewriting history, so be careful with that. We’ll talk about that in more details below, but for now just remember that you shouldn’t amend a commit that is already synchronised with the remote version of the repository.
Remove a file that has just been committed
In the second case scenario, you need to remove the file not only from the commit, but also from the whole git history (otherwise that annoying 1Go will stay there). In general, this is not an easy task, but we’re here in a special case : the big file has appeared in the very last commit, which makes it not too dangerous to cancel that commit without losing everything.
There are several strategies for that, here is the one that is to me the simplest (but probably not the safest) : reset your repository to the commit preceding the falty one, while keeping the changes that you’ve made to the files. In other words, you say to git go back to where I was just before I commited that last commit, so that you keep the files in the state they currently are at, but the commit itself has disappeared from the history.
Technically, you have two options : reseting can be made with the option
--soft or --mixed.
The first will place you at the moment right before
you commited, that is, when changes were already staged for commit. The second will
place you at the moment where you made changes to the repository’s files but
staged none of them yet. There is a third option --hard
that speaks for itself : it cancels both the commit and the changes to the
files. For the purpose of demonstration, we will chose here a soft reset. Here
is the whole sequence, including the initial falty commit :
git add .
git commit -m "Read client names from csv datafile"
# Damn it, this has just added a large clientdata.csv file !

git reset --soft HEAD~1  # this will reset the history to the previous commit
git status               # list the files that were added to the commit in first place
                         # with --soft, they remain staged after reseting
git reset HEAD clientdata.csv   # this is it
git commit -m "Read client names from csv datafile"
You’ll see that there are two reset instructions in the exemple. The first one,
git reset --soft HEAD~1, applies to the whole repository, while the second
one git reset HEAD clientdata.csv applies to a single file. The
first one is the procedure described in the above paragraph. As it is for
--amend, you shouldn’t reset after commits that were already synchronised,
since it will create diverging histories the moment you commit something new from
the reset timeline. We don’t like diverging histories at all : they mess up
both contributing safely and the overall readability of the repository.
The second reset statement allows you to withdraw the given file from the list of files that are to be commited, which is exactly what we want. Remember that thanks to the first reset, git went back to the point where clientdata.csv was a new file not appearing in the history.
The last statement is a simple commit, except that now clientdata.csv is not
included (you can check that on your git client) ! About this exemple, you would
probably want to add the large file to the .gitignore, so that you won’t
risk adding it ever again. You can do that simply with the following command :
echo clientdata.csv >> .gitignore
Another usage of git reset HEAD file is when you want to add all files but
a few to a commit. Instead of manually adding the ones you want with
git add ..., you can first add all of them with git add ., then withdraw
the few ones that you don’t want to commit with git reset HEAD unwanted_file.
Cancel changes to a file
Until now we were happy with the modifications we did to the files. The previous
commands helped us with organising the commits, but what happens if you’re unhappy
with the changes you’ve made on a file, even before thinking about a commit ?
When there have been a lot of changes, reverting them with the famous CTRL+Z
is not really a viable option.
Git offers a simple command to cancel all modifications made to a file, which is done by putting it back to the state it was at the last commit :
git checkout -- filetocancel
Note the difference between git reset HEAD file and git checkout -- file :
the first one is used when you did stage the file with git add file and want
to withdraw it from the list of files to be committed, while keeping the changes that you’ve made on that file.
The second simply puts your file to the state it
was at the last valid commit, which is before you changed anything on it.
In other words, git reset HEAD file is not a destructive operation since
it only affects the commit, not the file itself. git checkout -- file do
affect the file, so think twice before using it because it makes the changes
simply vanish (for real) !
Cancel a (past) commit
It will happen that after several commits, you realize that you did something wrong several commits ago. The problem is, you want to cancel what you did in commit n-3 without removing what you did in commits from n-2 to n. You could use a soft or mixed reset as seen above, but that’s likely to be complicated and unsafe.
Remember that a commit is a set of modifications to some files. So the right way to cancel those modifications is to commit the reverse modifications. That is, if the modifications in the falty commit are add a new line after line 66 to file A and add file B, the reverse modifications will be remove line 67 in file A and remove file B.
You have two ways of specifying which commit(s) to revert : either by giving the number of commits to look back from the current one, or with the falty commit id:
git revert HEAD          # revert the current (last) commit
git revert HEAD~1        # revert the previous commit
git revert HEAD~3..HEAD  # revert the last three commits

git revert 4be26a        # revert commit with id 4be26a, a git GUI is your friend
Note that reverting a commit do create a new commit with the reverse modifications and a default description “Revert commit X”. This says that you cannot change the past by changing what was done in commit X, for it would mess up all the subsequent commits. Let’s understand that a bit more.
Say that commit n-4 creates an empty file hello.txt,
and commit n-3 adds a "goodbye" line to hello.txt.
Should reverting commit n-4 actually change it, commit n-3 would then indicate
writing a line to a file that wouldn’t exist anymore, which is nonsense for git.
Instead, thanks to commiting the reverse modification of commit n-4, git simply adds to the timeline a new modification which is delete file “hello.txt”. This is much, much safer and robust. Below is a simple exemple of reverting the current commit.

This shows quite well why it is important to atomize your commits while developing, which is keeping the number of modifications appearing in a single commit low and coherent. The more you do that, the easier it will be to revert while knowing exactly what you’re reverting and what you’re not.
Temporarily store your changes
It will happen that you’ve made changes, and for any reason need to quit working on what you were. You’re not really ready to make a clean commit, meanwhile you’d like to save the changes, at least temporarily, so that you don’t accidentally start over a new development while having forgotten that something had changed.
When you use branches and collaborate with others, it will happen : while you’re working on branch A, Joe asks for your help on a bug on branch B. If you try to switch to branch B, git will probably refuse because you have unstaged changes that would otherwise be lost.
Enters git stash. This command stores your changes so that you can do
something elsewhere in the repository, and allows you to get back to it later, as
if you were never gone ! It actually is quite similar to a commit, except that
it does not record the changes in the timeline, but somewhere nearly invisible to you.
To yield your changes back, simply use git stash pop. Here is the workflow :
# doing stuff on files here, on branch A
# Joe is now asking for help on branch B
git checkout B  # going to branch B won't be allowed because of unstaged changes
git stash       # that's fine, just stash your changes
git checkout B  # now it's ok to switch to branch B
# helping Joe here
git checkout A  # go back to the branch you were working on
git stash pop   # yield the changes you made before so you can work again
At this point you undestand what is a commit and how to commit changes to your files with precision, and even forgiveness in case of small errors. Be sure to play with all the commands described here, since they are the ones that you will use the most.
The more you control what’s in your commits and when to do them, the cleaner and easier to read your timeline will be. Future-you and your partners will be grateful for that. Now let’s dive into the first step to work with others and develop new features safely : mastering branches and merge statements.