Your first steps with Git (part II)
In the previous section, we rapidly mentionned working with branches, which is all this whole tutorial is about. Now that you know how to manage commits, you will learn the upper-level usage of git : creating, managing and merging branches.
From commits to branches
When you first initialize a git repository, in the terminal window you’ll see
(master) appearing next to the folder path your at. This indicates which
git branch you’re checked out at, which is by default the master branch. We’ll
talk about branch names in a later section. For now let’s understand what is a
branch and what they are here for.
A fantasy of a lifetime
To understand what is a branch, let’s work with some fantasy. Imagine that your life follows a timeline onto which things that happen to you are stored (this is git). You can think of a branch as one possible path in that timeline. In the real case, your life timeline is purely linear, which means you have only one path where everything is happening, and it’s impossible to revert things that have been done (spoiler alert, this is not suitable for your code).
Branches in git work as if you’d have the superpower to test different paths for your life, or even making different lives exist simultaneously. That could be : I have job A, and I would want to know what would be my life with job B. So I create a job B branch, experiment with what my life is with job B, and then I can decide if I prefer to keep job A or to move to job B. Pushing to the extreme, I decide that I want to live both so I’ll create sort of a duplicated life, where I have job A in one timeline, and job B in the other, maintaining and living both of them simultaneously.
In the git world
This translates adequately to your code. Should it be a data science project or a web application (or any other you fancy), you’re likely to have a working main version of your code. In the meantime, you want to improve or test new features, without risking to break anything on the main version. This is especially true for a web application that other people than you use or develop onto.
A branch roots from another branch (except the
master branch which is the origin of your git tree), more precisely from another
branch’s commit. Most of the time you don’t have to think about which commit you’re
creating the branch from, since it is likely to be the current one. But know that it
is also possible to create a branch starting at a chosen commit, for instance when
you know things went wrong after that commit, and you want to fix things without
modifying the main code nonetheless.
Tarzan, or creating and moving through branches
The git command to navigate through your code’s branches is git checkout. If
you created a brand new repository for this tutorial, you should now be on the
master branch. On the exemple below, git is checked out at a develop branch.

To create a new branch, use the following command:
git checkout -b my-new-branch
The -b option stands for branch and is used to indicate to git that the
branch is to be created. That command actually wraps the two following commands:
git branch my-new-branch   # create my-new-branch but stay on develop
git checkout my-new-branch # move from develop to my-new-branch
On the screenshot below, I created the branch and git automatically moved to that branch, whose name is visible in the parenthesis next to the current folder path.

To see the list of available branches, use:
git branch        # display only local branches
git branch --all  # display all branches, including remote ones
So now that you have at least two branches, say master and my-new-branch,
you can choose either to commit on master, or on my-new-branch. Working on
my-new-branch allows you to work freely without affecting master. Once
you’re happy with what you did in my-new-branch and you want to add it to
the main code, you will proceed to a merge of my-new-branch onto master.
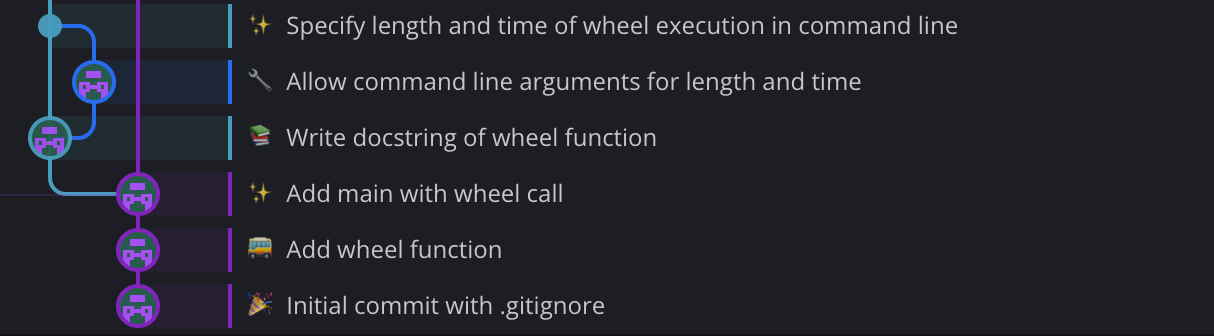
On the screenshot, you see the very first commits of this repository. The purple
branch is the main branch, always called master. From the third commit, I
created a new branch to work on a feature. On that feature branch, after a first commit,
I created a (blue) sub-branch, which was merged back on the first (light blue) feature branch.
Once completed, the (light blue) feature branch was then merged onto the master branch.
Note that you don’t necessarily have to merge a branch. You can use branches to make drafts that will never be merged onto anything. In that case, the branch allows you to try and break code without risk.
Merging branches and first collaborations
Now that you know both how to commit and create branches, let’s dive into the merge flow. You merge a branch onto another when you want to update the target branch with the work (i.e. the commits) that have been done on the merging branch.
This opens up a whole world of organising the way you work with branches, that is how and when to merge branches. We’ll call a branching model the set of names and rules you use to define how and when to merge branches in your project. The simplest flow is : you don’t use branches at all and always work on master. A more reasonable flow is to always create a branch to develop something, then merge it onto master when the new feature is ready and satisfactory.
The more complex your project, the more critical it is to use a reliable and well defined branching model. One of them, which is the object of this tutorial, is the git flow branching model. We’ll talk about it in the next section. For now, we’ll see the various ways of merging a branch onto another, and how to synchronise your local repository with others’.
Three ways of merging a branch
Understanding how merges work is a critical part of a good usage of git and a fluid collaboration. It is that tricky moment you put together the work done in various parts of your code, and as such is subject to a lot of difficulties. So take a break before entering that realm, and more than never experiment with your own code to see how things work.
Git allows for three different types of merge. All of them do update the target branch using the merging branch, but they produce a different timeline on the target branch once the merge is done. Choosing which merge behaviour to use depends on various factors that we’ll present here, and using this or that behaviour can be a part of your project’s branching model.
The generic instruction to merge a branch onto another is git merge. Say you
have a feature/a-new-hope branch ready to be merged onto develop. I personnaly
never remember which is the order to use in the git command, so I first checkout
the receiving branch (in that exemple, develop), then merge. The flow is
git checkout develop          # checkout the receiving branch
git merge feature/a-new-hope  # merge the feature branch onto develop
Specify one of the option presented below to choose a specific merge behaviour.
Fast-forward merge
The default behaviour of git merge is a fast-forward merge when possible.
A fast-forward is really just placing the merging branch on top of the receiving one,
to obtain a fully linear timeline, as if you had done the commits directly to develop.
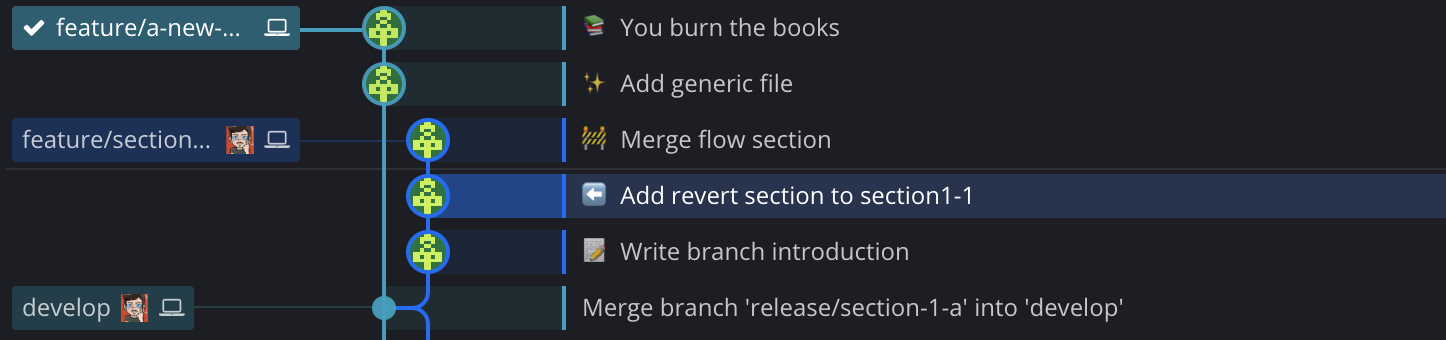
On the screenshot above, two branches are available from the tip of develop.
We want to merge branch feature/a-new-hope onto it, with a fast-forward. After
merging (with the standard git merge feature/a-new-hope which uses a fast-forward
by default), we get the following timeline :
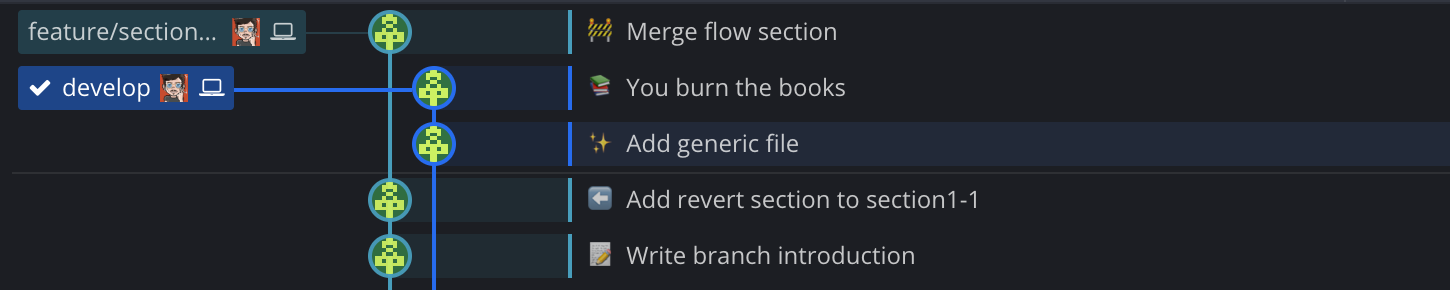
develop stays linear with the commits from feature/a-new-hope (which I
deleted after merging) added. We also see that the branch feature/section1-2 now
departs from an older commit of develop than the tip of it. This means that
you won’t be able to use a fast-forward merge of that branch onto develop, since
git cannot add the commits from it onto the last ones in a straightforward way.
If, in that configuration, you try git merge feature/section1-2 --ff-only,
git will abandon the merge because a fast-forward is impossible.
If you don’t provide the --ff-only option, git will use the merge commit strategy.
Sometimes you really want to use a fast-forward, so we’ll see later how to move
the merging branch along the tree, so that it can (almost) always be merged using a fast-forward.
Merge commit
The merge commit strategy is the one you’ll use the most when following the git flow. It consists in agregating on the receiving branch all the modifications from the merging branch in a single commit, while keeping the full detail of the commits succession on the merging branch. Here is what it looks like :
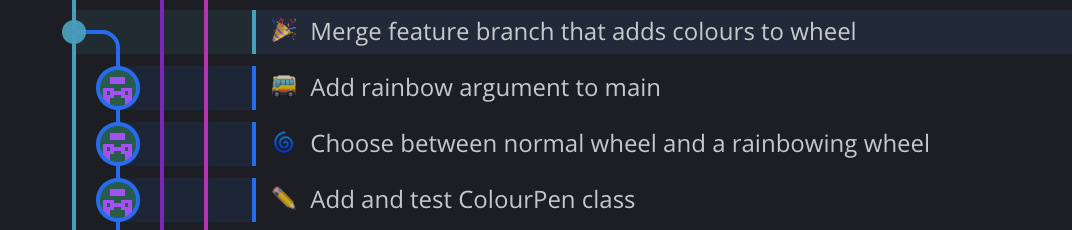
On the screenshot above, you see a feature branch comprised of three commits, that were merged onto the receiving branch using a single commit that makes the junction between the two branches. There are two main advantages of using merge commits :
- it keeps the timeline of the receiving branch clean and concise, since every new functionality is added through a single commit, contrary to fast-forward merges where all the commits are added on top of the receiving branch. This allows precise tracking of modifications on the important branches, while keeping the detail of the development history on the feature branch.
- the merge commit itself is a great place to provide detailed explanation about the new feature. Often your working commits are not all self-explanatory, and navigating throughout the history may be harsh, so having a merge commit that explains it all is of great help to other developers that need to know what modifications were added by this merge.
The command for a merge with a merge commit is (from the receiving branch) the following. It actually stands for no fast-forward, since, has said previsouly, git will by default perform a merge commit when a fast-forward is not available:
git merge --no-ff
Git provides a default value for the merge commit message which is something like merge branch <merging branch> onto <receiving branch>. You can keep that first line untouched while adding explanations below, or replace it with a more self-explanatory message. We’ll see in the next section how to write good commit messages. Also know that the merge commit is often the default behaviour of git hosts such as github, gitlab or bitbucket (we’ll see that in the pull requests section), because it perfectly embodies the flow of developing something on a feature branch then adding it all at once on the development or production branch.
Merge-and-squash
There’s a last option that I don’t recommend using in general : a squash merge. To me, it is kind of a bad compilation of the two previous ones. The behaviour is the following : with a squash merge, all the modifications from the feature branch are squashed into a single commit, which is added on top of the receiving branch. Here it how it looks like, before and after.
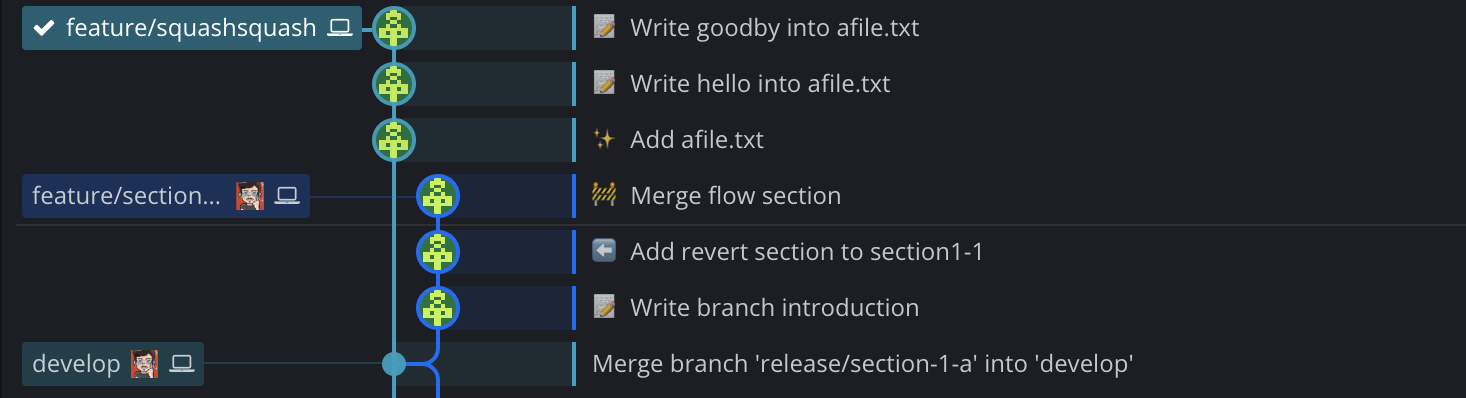
Before, the feature branch feature/squashsquash departs from develop
and is comprised of three commits.
I then squash-merged that branch onto develop with
git merge feature/squashsquash --squash. When performing a squash, you’re
creating a new commit out of the branch’s ones, so you need to use git commit
with a message to validate the squash. Once done, the timeline looks as follow :
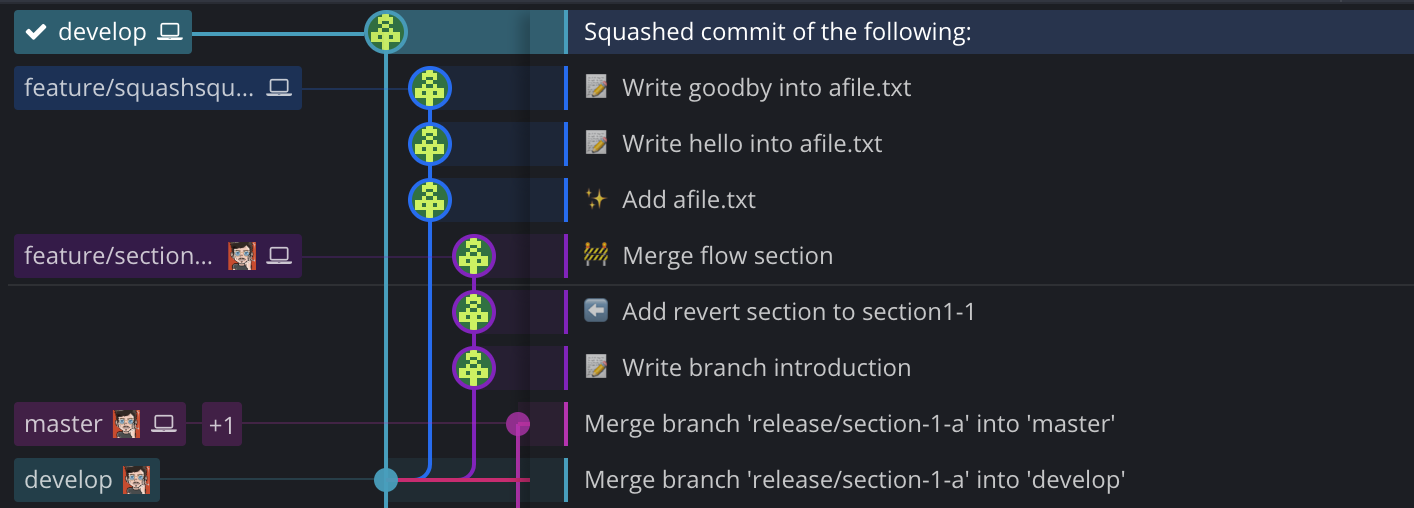
You see that a new commit was added directly onto develop, while the branch
feature/squashsquash remains living and not seemingly merged into develop.
Here is why I say it is a bad compilation of a merge-commit and a fast-forward :
- since the result is a commit directly on
developtimeline, it will be really hard to distinguish between commits that add a new feature to your code and commits that are usual commits (bug fixes, small commits, etc). When thedeveloptimeline will be long (and it will), you’ll have a hard time trying to find where (ie on which commit) you added that buggy feature. - since you combine all the branch’s commits into one, you’ll loose the detail of the branch development history, which is quite useful for debugging. Note that once squashed, you’re supposed to delete the merging branch, so you will definitely lose the branch details. Conversely, a merge commit, even if you delete the merging branch, keeps the detail of the development history.
The single case in which I use squash merges : you want to fix something or add
a really simple thing to develop. You could do it with a normal
commit, but you know that it is likely that the first trial won’t be good enough.
So instead of ending up with three commits because the first wasn’t working, with
the last two being “Fix previous commit” (😱), or repeatedly amending that first
commit until it works (we’ll see later why one doesn’t want to amend things on
develop), you can create a branch, freely do your stuff there – even naming
the commits with bad messages – and when you know the modifications are ready to be merge,
perform a squash merge, then delete the branch. This is precisely what branches are
for : allowing a trial and error development while keeping the important clean
and tidy.
There’s a good thing about squashes though : they can agregate numerous commits into a single one. The idea of keeping a relatively short development history is good, since it will help identifying milestones in your code, thus making debugging a lot easier than having to look for a bug in a thousand commits.
There are other ways to squash your timeline than the squash merge. We’ll see that in the collaboration part of this tutorial. For know, just remember that in most cases the merge commit strategy is the preferred one.
Synchronise with the rest of the world
For now we’ve only talked about managing our own version of the repository you’re working onto. You might remember
though that I said to avoid as much as possible rewriting history for branches that are shared with others
(mostly develop and master). We’ll see know how sharing with others work.
Remote and local version
In most cases, the repositories you’re working onto are hosted and synchronised somewhere on the web, on dedicated websites such as github, gitlab (where this repository is hosted), or bitbucket. The version of the repository that is hosted on the cloud and thus shared by everyone is called the remote version of the repository. You can find easliy the remote url of any repository by typing
git remote get-url origin
Contrary to simple files hosting services such as the infamous Dropbox (never use it for hosting code. Never), git does not automatically synchronise changes between your local version and what’s on the online version, for a simple reason : it is not always straightforward to know how to merge various changes that have been made in several places. On Dropbox, that would result in a conflicted copy of Danny’s version.
There’s another reason too : you don’t have to synchronise everything you do. As the remote version is the one that is shared and accessible by everyone, you might want to keep it clean and sound, without adding all of the sketches that you may have made locally. Let’s see what the instructions to synchronise your work and get other’s are.
Synchronising your changes : pushing
The first thing to know is how to publish your changes on the remote. That is, you’ve made a series of commits on a given
branch – locally – and you want those commits to be saved on the remote version (for backup reasons, or to share it with
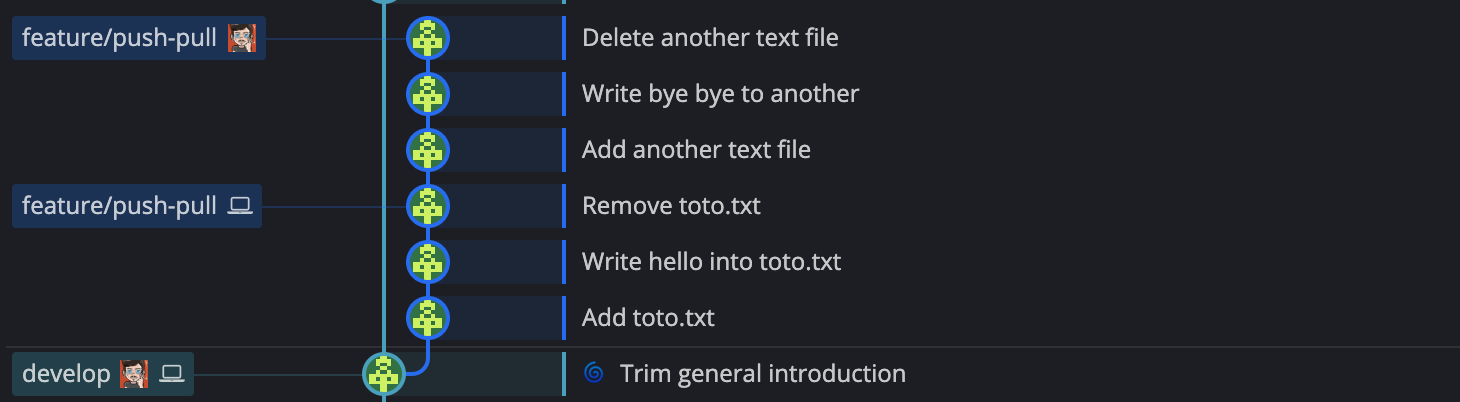
others). On the below example, I have a branch feature/push-pull comprised of three commits. As you can see, there’s only
a computer icon next to the branch’s name : that is GitKraken’s way of indicating that it is only a local branch. You can
compare with the icons next to develop, where there’s the computer and the avatar of the gitlab account where the remote
is.

I want to synchronise this branch with the remote so that, for instance, my friend Danny can see what I’ve made. The git term for that is push. It is rather intuitive : you’ve made some changes locally, and you push them onto the remote version so that they appear here to, thus being available to anyone contributing to the repo. The command for that is
git push # push when being checked out at the branch you wish to push
If you try to push a branch that you’ve just created locally, git will refuse that push with the indication that it couldn’t find a remote reference matching with the branch you’re trying to push, and will hint the following command
git push --set-upstream origin feature/push-pull
What happens here is that the branch does not exist yet on the remote version, and pushing can only work on a branch
that exists. So --set-upstream origin feature/push-pull indicates that the local branch feature/push-pull must
be pushed to a new branch on the remote called feature/push-pull too. You can mismatch names between local branches
and remote ones, but that’s only prone to confusion and not advised at all.
Update your local with the remote : pulling
The reverse operation is called (surprise) pulling. When you pull a branch from the remote, you’re telling git to apply to your local branch the commits that were found on the repository and that you don’t have yet locally. Pulling modifies your files locally according to the modifications listed in the commits you’re pulling from the remote. So you might want to detect changes in the remote without pulling them, in case those changes mess up with what you have locally, or just because you don’t want them. The command for that is
git fetch
This simply tells git to kind of ping the remote to know what the available changes are. It will detect not only new commits on the current branch, but also new branches. This is of use when you want to get locally a new branch that was created on the remote by someone else. You could create the branch locally then set its upstream to the remote one, but that’s a rather heavy procedure for the task.
Instead, simply fetch first, then checkout to the branch as if it already existed locally. Since git has fetched the remote branch, it knows that it exists on the remote, and just has to make a copy of it on your local version. That usually is done in one single command
git fetch && git checkout a-new-remote-branch
Pulling is full of surprises and often doesn’t work as expected. Let’s see how it works in the simplest case, were you
did nothing locally but there were modifications pushed by others. On the below example, the computer icon indicates where
is my local version of feature/push-pull. As you can see, there are three commits available on the remote that I
don’t have on my local branch.
If you use git status while being checked out at feature/push-pull, git will indicate that your branch is late
and can be fast-forwarded, using the following command
git pull
And that’s it ! Your local version of feature/push-pull has just been updated with the commits that were available
on the remote branch feature/push-pull. The basic workflow is thus pretty simple : use git fetch to know the
changes available for pulling, then git pull to actually get those changes (you can also just pull, because it
fetches automatically before). Then, commit as you want,
and use git push to update the shared version of the repository with your changes.
You might have noted that pulling was made in the above example with a fast-forward, which is the same term that is used for merging branches. That’s for a reason : pushing and pulling is actually nothing more than merging two branches, the local and the remote. When you pull, you’re merging the remote branch onto your local branch, that is applying on your local branch the commits that were made on the remote one. Conversely, when you push, you’re merging your local branch onto the remote one.
Distribution and priorities
Since pushing and pulling is actually merging, the same problems that can occur with merges occur when synchronising local and remote versions. In most cases pushing and pulling is done with a fast-forward, but it is not always possible. Being unable to push and pull freely is one of the most annoying thing when you start using git.
You made changes that you’re not allowed to push because someone else has also made changes and pushed them before. What’s the point of using such a complex tool if it is not able to handle that kind of recurrent situation on its own ? This is when the distributed part of DCVS that I mentioned in the introduction comes into play.
Git does not consider the remote version of the repository as primary. Even if it is often the origin for all the various local repositories that you and your team work on (you can read more about that here), the commits there will not be by default applied before yours.
Instead, any clone of the repository can contribute equally to all the other clones, including the remote, so that when there are several possibilities of merging branches or adding new commits, it’s up to you to place git in a situation where there will be a non-ambiguous way to merge things, or to tell it which way it should merge among all the possibilities. The responsability is distributed among all clones of the repository, without any being central to others. In the Collaborating with git section, we’ll dive into that subject to learn what to do when a fast-forward is not available, and how to avoid being in that situation in the first place.
Up to this point you already know all that is needed to contribute to a repository when things are straight-forward : you know how to commit changes, amend them if needed, create and navigate through branches, merge them and push/pull the changes to the remote and shared version of the repository.
As you can guess, things can get tricky – and they will, and that’s why one defines branching models, which are a set of rules and conventions that dictates how branches should be created and interacted with, to make the process of merging and synchronising more fluid and safer for every one.